Virtualization: NVMM Hypervisor
Table of Contents:
Introduction
NVMM is a Type-2 hypervisor, and hypervisor platform, that provides support for hardware-accelerated virtualization. A virtualization API is shipped in libnvmm(3), and allows existing emulators (e.g., QEMU) to easily create and manage virtual machines via NVMM.
NVMM can support up to 128 virtual machines, each having a maximum of 128 vCPUs and 127TB RAM. It works with both x86 AMD CPUs (SVM/AMD-V) and x86 Intel CPUs (VMX/VT-x).
NVMM was designed and written by Maxime Villard (m00nbsd.net), first appeared in NetBSD 9, and was ported to DragonFly 6.1 by Aaron LI (aly@) with significant help from Matt Dillon (dillon@) and Maxime.
Design
In order to achieve hardware-accelerated virtualization, two components need to interact together:
- A kernel driver that will switch machine's CPU to a mode where it will be able to safely execute guest instructions.
- A userland emulator, which talks to the kernel driver to run virtual machines.
NVMM provides the infrastructure needed for both the kernel driver and the userland emulators.
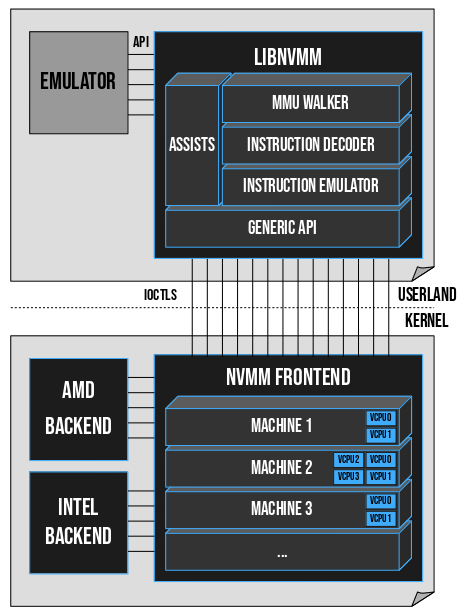
The kernel NVMM driver comes as a kernel module. It is made of a generic machine-independent frontend, and of several machine-dependent backends (currently only x86 AMD SVM and x86 Intel VMX backends). During initialization, NVMM selects the appropriate backend for the system. The frontend handles everything that is not CPU-specific: the virtual machines, the virtual CPUs, the guest physical address spaces, and so forth. The frontend also provides an IOCTL interface for userland emulators.
When it comes to the userland emulators, NVMM does not provide one. In other words, it does not re-implement a QEMU, a VirtualBox, a Bhyve (FreeBSD) or a VMD (OpenBSD). Rather, it provides a virtualization API via the libnvmm(3) library, which allows to effortlessly add NVMM support in already existing emulators. This API is meant to be simple and straightforward, and is fully documented. It has some similarities with WHPX on Windows and HVF on macOS. The idea is to provide an easy way for applications to use NVMM to implement services, which can go from small sandboxing systems to advanced system emulators.
An overview of NVMM's unique design:

(Credit: https://m00nbsd.net/NvmmDesign.png)
Read blog From Zero to NVMM (by Maxime Villard) for a detailed analysis of the design.
Usage Guide
Requirements
- AMD CPU with SVM and RVI/NPT support, or Intel CPU with VT-x/VMX and EPT support
- DragonFly master (6.1) at/after commit 11755db6
Setup
Add yourself to the
nvmmgroup (so you can later run examples and QEMU without usingroot):# pw groupmod nvmm -m $USERRe-login to make it effective.
Load the
nvmmkernel module:# kldload nvmmCheck NVMM status:
$ nvmmctl identifyOn my AMD Ryzen 3700X, it shows:
nvmm: Kernel API version 3
nvmm: State size 1008
nvmm: Comm size 4096
nvmm: Max machines 128
nvmm: Max VCPUs per machine 128
nvmm: Max RAM per machine 127T
nvmm: Arch Mach conf 0
nvmm: Arch VCPU conf 0x1<CPUID>
nvmm: Guest FPU states 0x3<x87,SSE>
Examples
calc-vm:
$ cd /usr/src/test/nvmm
$ make
$ /tmp/calc-vm <integer1> <integer2>
$ ./looprun.sh
demo:
$ cd /usr/src/test/nvmm/demo
$ make
$ /tmp/toyvirt /tmp/smallkern
libnvmm tests:
$ cd /usr/src/test/testcases/libnvmm
$ make test
QEMU
Basic setup
Install QEMU:
# pkg install qemuCreate a disk:
$ qemu-img create -f qcow2 dfly.qcow2 50GBoot an ISO with NVMM acceleration:
$ qemu-system-x86_64 \
  -machine type=q35,accel=nvmm \
  -smp cpus=2 -m 4G \
  -cdrom dfly.iso -boot d \
  -drive file=dfly.qcow2,if=none,id=disk0 \
  -device virtio-blk-pci,drive=disk0 \
  -netdev user,id=net0,hostfwd=tcp:127.0.0.1:6022-:22 \
  -device virtio-net-pci,netdev=net0 \
  -object rng-random,id=rng0,filename=/dev/urandom \
  -device virtio-rng-pci,rng=rng0 \
  -display curses \
  -vga qxl \
  -spice addr=127.0.0.1,port=5900,ipv4=on,disable-ticketing=on,seamless-migration=on
This setup creates a VM of settings:
- Modern machine (Q35) with NVMM hardware acceleration
- Emulate the host processor with 2 vCPUs
- 4GB RAM
- VirtIO-BLK hard disk
- VirtIO-NET network card
- VirtIO-RNG random number generator
- Display video output via curses
- User-mode networking (TCP/UDP pass-through; no ICMP), with port-forwarding (host
127.0.0.1:6022to guest22port) - SPICE remote desktop support (use
qxlfor more powerful graphics support), accessible via127.0.0.1:5900
To connect to guest via SSH:
$ ssh -p 6022 user@127.0.0.1
To connect to guest via SPICE (install package spice-gtk to get the spicy utility):
$ spicy -p 5900
By the way, the created VMs can be shown with:
    # nvmmctl list
    Machine ID VCPUs RAM  Owner PID Creation Time
    ---------- ----- ---- --------- ------------------------
    0          2     4.1G 91101     Sat Jul 24 17:55:22 2021
TAP networking
The above setup uses user-mode networking, which has limitations in both performance and functionalities. A more advanced network can be achieved by using the TAP device.
Create a bridge (
bridge0) and configure it:# ifconfig bridge0 create # ifconfig bridge0 inet 10.66.6.1/24 # ifconfig bridge0 upCreate a TAP device (
tap666) and add it to the bridge:# ifconfig tap666 create # ifconfig tap666 up # ifconfig bridge0 addm tap666Adjust TAP sysctls:
# sysctl net.link.tap.up_on_open=1
# sysctl net.link.tap.user_open=1
Make the TAP device can be opened by yourself:
# chown $USER /dev/tap666NOTE: Should have a better way to do this; devd(8) could be used.
Start QEMU with option
-netdev tap,ifname=tap666,id=net0,script=no,downscript=no, i.e.,$ qemu-system-x86_64 \ ... \ -netdev tap,ifname=tap666,id=net0,script=no,downscript=no \ -device virtio-net-pci,netdev=net0,mac=52:54:00:34:56:66NOTE: QEMU by default assigns the link-level address
52:54:00:12:34:56to guest. If unspecified, all guests would have the same MAC address. Specify the MAC address with-device xxx,netdev=xxx,mac=52:54:xx:xx:xx:xx.Configure guest IP address:
guest# ifconfig vtnet0 inet 10.66.6.2/24 up
guest# route add default 10.66.6.1
And then the guest can communicate with host and vice versa.
guest# ping 10.66.6.1
host$ ping 10.66.6.2
Bridged Network
With the above setup, guests can only talk to each other and the host, but can't access the external network. One way to make VM access the external work is configuring a bridged network: the host machine is acting as a switch, and the VM appears as another machine (similar to the host machine) in the LAN.
Create the bridge interface in the same way as above, but no need to configure its address:
# ifconfig bridge0 create
# ifconfig bridge0 up
Create the TAP interface and configure it the same way as above:
# ifconfig tap666 create
# ifconfig tap666 up
# sysctl net.link.tap.up_on_open=1
# sysctl net.link.tap.user_open=1
# chown $USER /dev/tap666
Add both the TAP interface and the host network interface (e.g.,
re0in my case) to the bridge:# ifconfig bridge0 addm re0 # ifconfig bridge0 addm tap666NOTE: Adding an interface to the bridge will auto enable promiscuous mode for it.
Start the VM the same as before, and run DHCP inside the VM, e.g.:
vm# dhclient vtnet0Now the VM can obtain IP configuration from the LAN router and can access the Internet, e.g.,:
vm# ifconfig
vtnet0: flags=8843<UP,BROADCAST,RUNNING,SIMPLEX,MULTICAST> metric 0 mtu 1500
        options=28<VLAN_MTU,JUMBO_MTU>
        ether 52:54:00:12:34:56
        inet6 fe80::5054:ff:fe12:3456%vtnet0 prefixlen 64 scopeid 0x1
        inet 10.6.20.34 netmask 0xffffff00 broadcast 10.6.20.255
        media: Ethernet 1000baseT <full-duplex>
        status: active
WARNING: This method exposes the VM to the LAN and makes it accessible to all other LAN machines besides the host machine. This can render the VM in risk and also may reveal sensitive information from VM!!
NAT
Another way to allow VM access the Internet is to configure the NAT on the host side. This method doesn't expose the VM beyond the host machine, and thus is regarded more secure.
Enable IP forwarding:
# sysctl net.inet.ip.forwarding=1Configure NAT with PF(4) by adding the follow snippet to
/etc/pf.conf:ext_if = "re0" br_if = "bridge0" nat on $ext_if inet from $br_if:network to !$br_if:network -> ($ext_if:0)Enable and start PF:
# echo 'pf_enable=YES' >> /etc/rc.conf
# service pf start
Now, the guest can access the external network.
DHCP & DNS
A DHCP server can be run on the bridge interface to provide guests with auto IP address configuration. Similarly, a DNS service can be provided to guests.
TODO: dnsmasq
IPv6
TODO...
Graphics
TODO...
Audio
TODO...
USB
TODO...
PCI Passthrough
TODO...
Issues
- QEMU
-cpu hostdoesn't work. Need to investigate the root cause.
Resources
- NVMM kernel code: machine-independent frontend, machine-dependent x86 backends
- libnvmm API code
- libnvmm test cases
- nvmmctl utility code
- Examples: calc-vm, demo
- nvmm(4) man page
- libnvmm(3) man page
- nvmmctl(8) man page